Animating a model in Blender using rigify and makewalk

When messing up with game development people would usually stuck on getting animations for their models. This tutorial completely focus on animating 3D model easily without stressing your nerves.

Step 1

step 1

Importing The Base Model

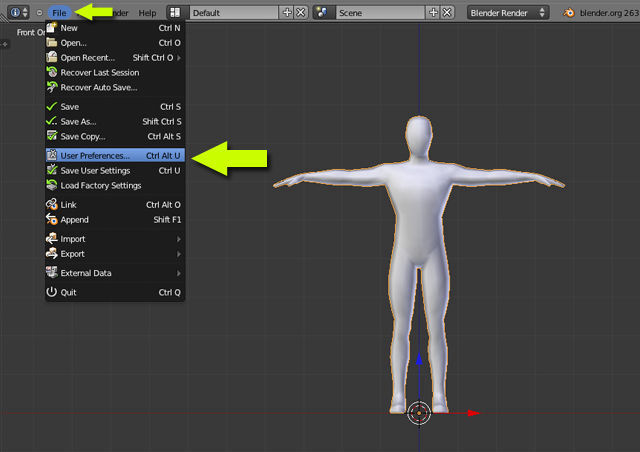
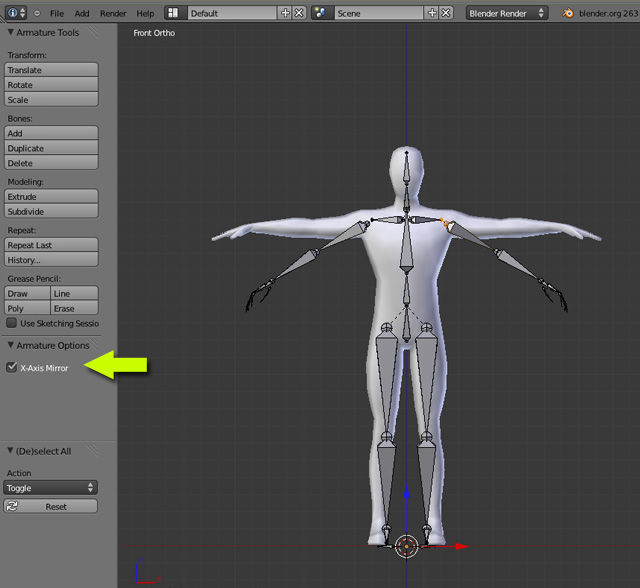
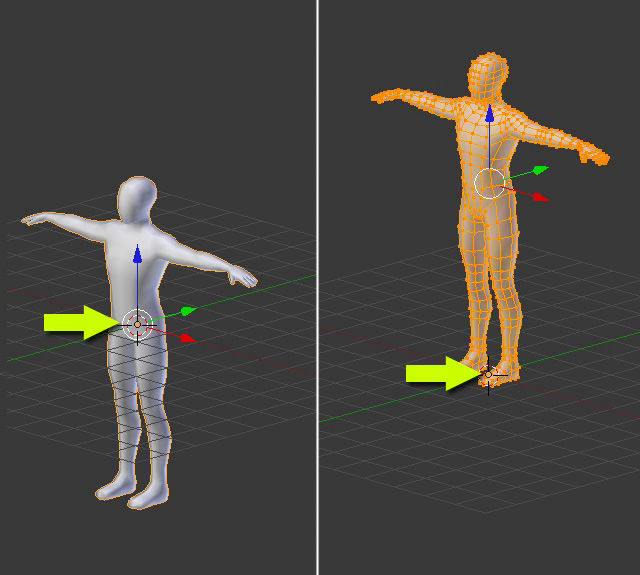
Open a new file and import the base model (File > Import). You can use any other biped model as well. With the model selected, press Alt+G to clear its location, so that it's placed at the center. Make sure the center of the model (orange dot) is at the bottom of the mesh. If not, Press TAB to get into edit mode and select all vertices with the A key and then Press G and move the vertices up, so that the center point is at the base of the mesh. Press TAB to get out of edit mode.

Step 2

step 2

Enable Riggify Addon

Next we will enable the Rigify add-on. In the File menu select User Preferences.

step2.2

Select the Add-on Tab and in the search box type Rigify and check the tick box to enable it. You may press the "Save as default" button, so that Blender remembers the setting. You can now close the User Preferences Window. 

Step 3

step 3

Adding Armature

Make sure the 3D cursor is at the center point (bottom) of the mesh. If not, then select the object and press Shift+C and then select cursor to selected. Press Shift+A and select Armature, and now you will notice that there is a new item called Human Meta-Rig. Click on it and you will have a Human Rig.

Step 4

step 4

Enabling X-Ray

With the Human Rig selected, go to the Armature Properties and in the Display Panel, check X-Ray. This will enable us to see the armature through the mesh.

Step 5

step 5

Scaling and Rotating

With the Meta-Rig selected, press TAB to enter into edit mode. Scale the rig to match the mesh. Press . (period) to make the 3D cursor the pivot point for rotation and scale, and then Scale the bones. Press , (comma) to make the Median Point the center of rotations / scale.

Step 6

step 6

Enabling X-Axis Mirror

Press T to bring out the Tool Shelf and in the Armature Options, check "X axis mirror". This way any editing done on one side will be mirrored to the other. 

Step 7

step 7.1

Matching Armature To Model

Select and move the bone tips to match the mesh.

step 7.2

Check from the Top view as well.

step 7.3

Adjust the leg bones.

step 7.4

Match the bones from the side view. Make sure to keep the knee bone a bit bent forward, i.e. don't make the leg bones in a straight line. Once done, Save the file.

Step 8

Skinning Mesh To Armature

Press TAB to get out of edit mode. Now we will skin the mesh to the armature. Select the mesh first, and then the Meta-Rig and press Ctrl+P and select automatic weight. The mesh is now skinned to the armature Setup.

Step 9

Downloading Blender Tools For Makehuman

First of all download Blender tools for makehuman from the official makehuman site.
http://www.makehuman.org/download.php

Step 10

Enabling Makewalk Addon

Next we will enable the make-walk add-on. Open blender ,In the file menu select user preferences. Select the add-on tab and in the search box type make-walk and check the tick box to enable it. You may press the "Save as default" button, so that Blender remembers the setting. You can now close the user preferences window.
If you can't find make-walk by typing it in the search box then try to find make-human tools in left pane of addons. Tick make-walk there.

Step 11

step 11

Getting The User Interface

The user > interface of Make-Walk is located in under the Armature tab, and becomes visible when an armature is selected. It consists of six panels; the first one is open by default and the others are closed.

Step 12

Loading Mocap File

Select the rigged armature and click on load and retarget. Select BVH mocap file.
It will load animations to the rigged armature click on animation play or press Alt+A to
watch your character moving. 

Step 13

Exporting Animated Mesh

Export your model to your desired format. I personally suggest to export it to .ms3d (since CopperCube 6) we now have .FBX models support too, so it is advised to export in .FBX format for CopperCube 3D or you can export it to any other format supported
by your Game Engine.

Troubleshooting

Skinning Mesh To Armature

 It may be possible that when you click on Load and retarget option. Blender will show you an error asking you to resolve rotation and location of your armature. To resolve this issue, simply select your armature and press Ctrl+A tick rotation, scale and location option. Now try again to load and retarget BVH mocap file.

Links

Thousands of Free BVH mocap files

Here is the URL to download thousand of free BVH mocap files
https://sites.google.com/a/cgspeed.com/cgspeed/motion-capture/cmu-bvh-conversion


Share this Page!

About

Neophyte is a website developed to provide tutorials, assets and source files of CopperCube projects.

Join Us